Wednesday, November 2, 2011

What's Cookin?


What to cook for dinner? After a busy day, trying to decide what to cook is usually difficult. When you finally come up with an idea, it seems you never have the ingredients you need. What helps me with this challenge is menu planning! I just recently started doing this and I find it to be so much easier! I love cooking but seemed to always find myself struggling to come up with a dinner idea each night because I wouldn't have all the ingredients I needed. Menu planning allows me make my grocery list and be sure I have everything I need for the entire week. So each Sunday I sit down with my recipe book, and my computer (there are so many great recipes online!) and I plan each night's dinner and make my grocery list. I would usually just jot down the meals on a scrap piece of paper, but finally decided to create a menu chalkboard where I would have it posted in my kitchen.

So hence we have my most recent project:

This is the menu board we created in my kitchen. We created the entire thing ourselves by first using masking tape to block off the squares and then painting over the squares with chalkboard paint. (When I say we I am including my husband. He did all the measuring and making sure the squares were straight. This is not one of my strengths!)  I cut out the letters using my cricut machine and vinyl adhesive paper. I was so happy with the way the project turned out and we use this every week!  I will share my upcoming menus and recipes in future posts!

Happy eating!

Tuesday, November 1, 2011

Banana Bread Muffins


The first day of November. From now until New Years I feel like food is constantly on my mind and I'm constantly wanting to bake something. This time of year just puts me in such a baking mood! So what did I want to do first thing this morning? Bake banana bread muffins of course!
This recipe is originally from a Better Homes and Gardens cookbook but I have tweaked it slightly. The original recipe was not quite sweet enough and didn't use enough bananas. I like to use very ripe bananas for this recipe or any banana bread recipe. I'm talking the really brown almost ready to throw away kind. You can even freeze bananas when they get to this point and then just pull them out as needed. When you get them out of the freezer just defrost in the microwave for about one minute and the peeling will slide right off and they will mash so easily. Perfect for banana bread recipes!
These turned out oh so yummy. Perfect with a big cup of coffee! Here is the recipe!

Banana Bread Muffins with Streusel Topping
 1 3/4 cup all-purpose flour
1/2 cup sugar
2 tsp baking powder
1/4 tsp salt
1 beaten egg
1/2 cup milk
1/4 cooking oil
3-4 bananas (peeled and mashed)
1/2 chopped nuts (optional)

Preheat oven to 400 degrees and grease 12 muffin cups. Combine flour, sugar, baking powder, and salt. Make a well in the center of the mixture and set aside. In a separate bowl combine egg, milk, oil and bananas. Add the egg mixture to the flour mixture all at once and stir just until moistened. Stir in nuts if desired. Spoon mixture into muffin cups filling 2/3 full.

Streusel Topping
Combine 3 tablespoons of all-purpose flour, 3 tablespoons of brown sugar, and 1/4 teaspoons ground cinnamon.  Cut in 2 tablespoons of butter until mixture resembles coarse crumbs.  Sprinkle over the top of each muffin.

Bake for 18-20 minutes or until golden brown and wooden toothpick comes out clean. Allow to cool 5 minutes before serving.

Enjoy!!

Monday, October 31, 2011

Cowboys and Indians

What a busy weekend full of fall fun! With two Halloween parties and volunteering for trick or trunk at our church, we spent most of the weekend in costumes! And I think I have eaten my weight in candy corn!! Each year around September I start thinking about costume ideas. I love for our costumes to all coordinate but now that we are a family of four this is more challenging! I try to get creative with costumes and not just go out and purchase one for all of us. My poor husband just waits for me to tell him what he will be wearing each year. :) He is such a good sport and goes along with all my crazy ideas!
This year I decided on cowboys and Indians-mostly because this allowed us to purchase the least amount of items possible! We only had to purchase one little Indian costume and one little cowboy hat. The rest we either had or borrowed from friends. I made my Indian costume from a family member's old dress. Super easy. I just cut the ends to make fringe and glued Aztec ribbon around the arms and neck. I made a headband with feather attached, wore brown boots and my costume was complete. Cowboy outfits are easy as long as you have a bandanna and hat! 

 My sweet little Indian!

Happy Halloween! 

Thursday, October 27, 2011

Homemade Cinnamon Dolce Latte

I love coffee. I mean I really love coffee. I wake up looking forward to my morning cup of coffee and find myself wanting it throughout the day. Every dessert, book, or comfy chair is more complete when a giant mug of coffee is in your hands. Rainy days? They scream coffee all day long!
I could spend a fortune at Starbucks because I love almost every drink there. If I'm in a ten mile radius of Starbucks I somehow find my car slowly drifting that way and before I know it I have a large steaming cup of soul warming goodness. Oh and I live less than 5 min away so you get the picture of how often I frequent there. The drinks there are so expensive though! You can hardly make it out of there spending less than five bucks. So I figured it up and if I visited Starbucks everyday, in a year I would have spent over $1800! Seriously? Think of all I could buy with $1800!
So anyways I have been experimenting with making my own Starbucks like coffee drinks at home, and I have to admit that they have been just as good! The cinnamon dolce latte is one of my classic favorites and it is SO EASY to make at home.
You just need one cup of milk, 1/2 tsp of cinnamon, and 1-2 teaspoons of sugar.
And of course coffee!!
 Mix cinnamon and sugar together. Add more or less sugar depending on how sweet you like your coffee drinks.
 Add milk and whisk together. Heat over medium heat just until it begins to boil.
 Pour into your coffee and you're ready to enjoy your own cinnamon dolce latte!

Now wasn't that easy??
Enjoy!!!

Wednesday, October 26, 2011

Fall Artwork

My two year old daughter is obsessed with painting right now. Every morning she says "Mommy, I want to paint today." She is happy just freestyle painting with her little paint brushes but lately I've been trying to explore some new ideas with her. We've been using our fingers, sponge letters and today we decided to create some fall art. I wanted to share with you three of the activities we did. They are all so easy and require very few supplies!
 Collect orange paint, a round sponge and paper. I happened to have these round sponges with a handle, but you could always use a different shaped sponge.

 Draw a simple pumpkin shape on the paper and then let them get to painting!

Cute little pumpkin! 
 This is our attempt at a colorful fall tree. I first painted out a tree trunk and branches. If your child is older they could draw their own. Then I let her use the round sponge to add colored leaves. She loved this!

 Some of the leaves started wandering off the tree :) We just considered those falling leaves and the one that fell a little too far we turned into a pumpkin!

Our third art project goes with the fall children's song "Five Little Pumpkins". My daughter loves this little song. If you are not familiar with it, here are the words and motions. Try singing it with your little one! They will love it!

Five little pumpkins sitting on a gate (five fingers up)
The first one said "Oh my it's getting Late" (Hands on Cheeks)
The second one said "There's a chill in the air" (arms around self)
The third one said "But we don't care" (swing pointer finger)
The fourth one said "We're ready for some fun!" (hand in air)
The fifth one said "Let's run, run, run!" (running motion)
So woooo went the wind, and out went the lights,
And the five little pumpkins rolled out of sight!

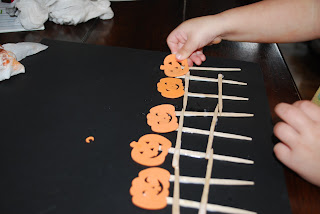
So after several rounds of this cute little song we decided to make a picture out of it. We created our gate using some wooden sticks I had. You could use craft sticks or toothpicks also.

 We designed our gate! This was her first time using glue. We had a couple of instances of trying to eat the glue, due to it resembling icing. So there was also a lesson on not eating glue. :)
 I had these foam pumpkin stickers that I have had forever and have had no use for. They were perfect for this activity. Of course you could always use paint or draw the pumpkins!
Five little pumpkins sitting on the gate!

Have fun exploring your creative side!

Tuesday, October 25, 2011

Pumpkin Carving Party

Last year was the first year that I decided to host a pumpkin carving party. This past weekend we had our second one and I think this is a tradition that is going to stick around! It is such a perfect fall occasion! We kept things simple with soups, finger foods, and cookies. We had a pumpkin carving contest, painting for the little ones, and a bonfire to end it all. We were blessed with perfect weather and the entire event went perfectly! Lots of fun memories made!
 Carvers at work!
Pumpkin painting for the little ones!
Messy but oh so fun!!


Wagon rides!


We had so many delicious foods!!

 Comfort food chili...
 Pumpkin Trail Mix...
"Monster" Cookies...
Pumpkin Spice Cookies

I made some simple decorations for the party-


After lots of carving and LOTS of eating here are the finished products!!!

And the winners are......

 
First place prize- Adorable fall apron!!

Can't wait for next year!!

Monday, October 24, 2011

Banners

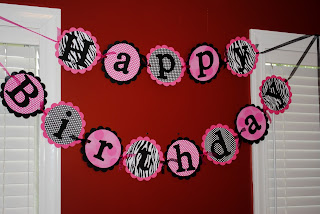
When it comes to decorating for parties, almost every party needs some type of banner. When it comes to purchasing one you will quickly find your options are limited. Very limited. If you want any sense of uniqueness then you must get creative! Of course not everyone has the tools, ability, or time to create their own banner. There are so many adroable banners that can be purchased on websites such as Etsy. The great thing is these banners can be personalized!
Here are some banners I have created for various occasions:
This one I did for my cousin's graduation party. Simple and colorful and the "congrats" could be used for a separate occasion.


These were done for a couple's baby shower. They wanted something girly, but still classy because it was being held at a restuarant. I designed the banner so that it could be used for two occasions. The sign said "Welcome Eliana" and was hung as one piece across a stage. The following day they separted the words and hung across a fireplace mantle for a different baby shower! They sign worked so well for both occasions and was super cute!
This was from my daughter's second birthday party! Minnie Mouse theme! More pictures from this party to come in a future post! I loved all the bright colors in this banner!

This was for a 50th birthday party! Actually it was used for two separate birthday parties! I love making signs versatile so they can be reused!