Monday, November 21, 2011

Foam Ornaments

This weekend I helped my two year old make her first Christmas ornaments. We are planning to put our tree up this week and I wanted her to have some ornaments that she had made herself to put on the tree. So I rummaged through my craft box and found some foam, buttons, and ribbons, and we got creative.

There are several foam ornament kits that you can purchase. Of course this is much simpler but I love tyring to create something with the materials you have. I want to encourage creativity in my daughter and we had so much fun trying to decide what would make a good snowman scarf, arms, etc.

Ornament #1 - Christmas Tree

I started with a 4x6 piece of green foam and sketched a Christmas tree on it, drawing a circle at the top of the tree so I could punch a hole at the top. You don't have to be an artist to do this! As long as you can draw a triangle, you can draw a tree! If your children are older they can even do this themselves.
Next, punch a hole in the top.

Now the fun part! Give you child a selection of buttons and let them glue the "ornaments" on the tree.


She had so much fun doing this and ended up with a pretty cute tree! Tie a string or ribbon through the top and you are finished!


Ornament #2 - Snowman

For our snowman I used my circle punch to cut out three circles from white foam. If you don't have a circle punch you could always draw the circles yourself- this was just quick and easy!

We used toothpicks for the arms, ribbon for the scarf, and buttons for the eyes. The hat and nose are both foam pieces as well. My two year old needed more help with this one but she loved helping me choose the ribbon and buttons and colors to use.


So simple and fun! Now we just need a tree!

Monday, November 14, 2011

Chocolate Chip Pumpkin Pancakes

Pancake breakfasts on Saturday mornings are starting to become a tradition around here. My two year old loves to help me make pancakes and would eat them for breakfast everyday if I would let her. (Of course I don't, although it's tempting because I love them as well!) I love trying different pancake recipes and I figured pumpkin pancakes would be a perfect breakfast for a beautiful fall morning. Pumpkin is so good for you and I also used whole wheat flour to make them even healthier. Of course in order to make sure my daughter would eat these "healthy" pancakes I threw in some chocolate chips. The flavors of pumpkin and chocolate are a match made in heaven!


These were so good and a nice change from regular pancakes. The whole wheat flour does give them a different texture and taste so if you are not a fan of it then just use all purpose flour. Or you can use half of each to give them less of a wheat texture.

Whole Wheat Chocolate Chip Pumpkin Pancakes

1 cup of whole wheat flour
1 1/2 tablespoons of brown sugar
1 teaspoon of baking powder
1/4 teaspoon of baking soda
1/4 teaspoon salt
1 teaspoon cinnamon
1/4 teaspoon nutmeg
1 cup of buttermilk
1 egg, slightly beaten
1/4 cup of pure pumpkin
1/2 tablespoons melted butter
1/2 chocolate chips

Combine the flour, brown sugar, baking powder, baking soda, salt, cinnamon, and nutmeg. Make a well in the center of the mixture and set aside.
Combine the milk and egg and mix well. Add the pumpkin and stir until blended. Finally add the melted butter and stir again until well blended.
Add the egg mixture to dry ingredients and stir just until moistened (batter should be lumpy).


Pour about 1/4 cup of batter onto a hot lightly greased skillet. I just use my measuring cup to scoop the batter out and pour on the skillet. Place the chocolate chips on the pancake. You can use as many as desired! I use about 6-7 per pancake but depending on your love for chocolate you may want to use more or less! Cook until bubbles form on the top of the pancake and the bottom is golden brown and then flip and cook on the other side. Do not flip more than once!! You never want to overflip a pancake!


Serve these little pumpkin babies warm with hot maple syrup and watch them quickly disappear!!!

Thursday, November 10, 2011

Maple Glazed Chicken with Mashed Sweet Potatoes


Last night we had one of my favorite fall time meals. I love sweet potatoes this time of year but they are especially good mashed and go so well with this chicken. Oh and this is such an easy meal to make! This recipe originally came from Allrecipes.com but I have made a few changes. This is a must try!! As far as the maple syrup I have made it with both the real stuff and imitation syrup. Either way was great! I don't often buy real maple syrup so I just use whatever I have on hand. Here's the recipe!

Recipe for Mashed Sweet Potatoes

1 1/2 pounds sweet potatoes peeled and cut into one inch slices
3 tablespoons butter
3 tablespoons brown sugar
1/2 teaspoon cinnamon

Place peeled potatoes in a large pot and cover with water. Bring to boil over high heat and then reduce heat to medium-low, cover and simmer until tender (about 20-25 minutes). Drain and mash the potatoes with a hand masher. Add remaining ingredients and mix well.

Recipe for Maple Glazed Chicken

1 pound of chicken tenders
2 teaspoons of Montreal Steak Seasoning
2 tablespoons vegetable oil
1/2 cup Maple Syrup
1/2 cup minced onions

Heat oil in skillet over medium heat. Sprinkle chicken tenders with seasoning and cook in hot skillet over medium heat until no longer pink (about 5-8 minutes per side). Remove chicken and add maple syrup and minced onions to the skillet scraping up any of the browned bits still in the skillet. Bring to a boil and and simmer 2 minutes.

Now you are ready to eat! To serve place chicken on top of the mashed potatoes and pour the glaze over the entire thing! So delicious! This is the perfect combination of savory and sweet!


Wednesday, November 9, 2011

Fun with Fruit Loops

So I haven't posted since last week because we suddenly found ourselves bombarded with things to do. During the busy times we find ourselves eating out more often and the time spent at home involves chores. So this means I have done very little cooking and of course there has been no time for fun crafts. Today however we have been back at home and I spent some time this morning working on counting and sorting skills with my two year old. (And I will be cooking Maple Glazed Chicken with Mashed Sweet Potatoes tonight - so look for that recipe in a future post!)

So my two year old loves Fruit Loops. I usually don't even buy the cereal because I know it is just pure sugar and if they are in the house then she is constantly asking for them. But my husband went grocery shopping with us last weekend and we somehow ended up with Fruit Loops and sprinkled donuts. He tends to be a bit of a push-over when it comes to his little girl. :)

So since we have these colorful  little cereals all over our house I decided we would use them for a little bit of learning this morning. I had saved an empty egg carton and baby food jars with really no purpose in mind except that they could be reused for something. Combine the cereal and my empty household items and we ended up with a Fruit Loop learning center.

Here's what I did:

I covered the baby food jars with different colored paper and labeled with the name of the color. I let her use these jars to practice sorting her colors. She LOVED this! She knows most of her colors and this was excellent practice in sorting. She would pour them out and resort them over and over again. The labeling is also good for word recognition!


 The second thing we did was use the empty egg carton to practice counting. I used a circle punch to cut out twelve circles.
I wrote the numbers one through twelve on them and I then placed each circle in the bottom of each egg carton cup.


We then practiced counting by placing that number of Fruit Loops on top of each number!


This was a little more challenging for her since she is only two, but was great practice! She eventually just started putting the Fruit Loops wherever she wanted them but was still counting the entire time. I can easily keep this and we can pull it out and practice repeatedly. This could also be used with money, buttons, marbles, beans, etc.

Oh and of course she ate several of the Fruit Loops during the process but at least she was learning while doing so! :)

Thursday, November 3, 2011

Thankful Thursdays

I love the month of November. I love the fall colors, crisp air, yummy foods, and of course the best part is ending the month with Thanksgiving. I love the idea of spending not only Thanksgiving day, but the entire month reflecting on the things you are thankful for. So I decided that this year I'm going to create a jar, where each day I can jot down one thing I am thankfull for and place inside the jar. Now I'm sure there will be days where I forget, quite possibly more days that I will forget than remember, but this seems like a nice goal to have.
So I simply took an old vase, wrapped a ribbon around it and I'm placing this in my kitchen because I spend a large part of my day there. I think if nothing else the vase will be a daily reminder to slow down and be thankful for the little things in life.


So what am I thankful for today? Simple. The fact that I am able to stay home with my sweet children each day. I never knew how much I would enjoy this. Now it is definitely not easy! When both of them are screaming and the house looks like it was hit by a tornado, I feel like pulling my hair out. Some days I think I want to go back to work! Or simply just get out of the house! Or have an adult conversation during the daytime hours!

 But I wouldn't trade these small moments for anything. The moments when I hear those little voices waking up and calling momma, the moments when we all pile into my bed in our pajamas, the time spent reading stories, singing songs, and laughing together. My favorite part of staying home is the time to spend savoring the little things.

 Now I'm not at all a stay at home kind of person. In fact me and the kids rarely stay home :) Sometimes I miss my career and find myself wanting more to do! (crazy i know!) I get bored easily and I'm constantly trying to find something to fill our days and keep us busy. But sometimes during the moments when the three of us are just sitting in the floor playing together, it hits me. I am so blessed! I need not complain about anything because I get to spend my days being a mother to two little children that love me with all their little hearts. So today during the chaos and quiet moments, I'm thankful for each second I get to spend with the greatest little blessings God has given me.

Wednesday, November 2, 2011

What's Cookin?


What to cook for dinner? After a busy day, trying to decide what to cook is usually difficult. When you finally come up with an idea, it seems you never have the ingredients you need. What helps me with this challenge is menu planning! I just recently started doing this and I find it to be so much easier! I love cooking but seemed to always find myself struggling to come up with a dinner idea each night because I wouldn't have all the ingredients I needed. Menu planning allows me make my grocery list and be sure I have everything I need for the entire week. So each Sunday I sit down with my recipe book, and my computer (there are so many great recipes online!) and I plan each night's dinner and make my grocery list. I would usually just jot down the meals on a scrap piece of paper, but finally decided to create a menu chalkboard where I would have it posted in my kitchen.

So hence we have my most recent project:

This is the menu board we created in my kitchen. We created the entire thing ourselves by first using masking tape to block off the squares and then painting over the squares with chalkboard paint. (When I say we I am including my husband. He did all the measuring and making sure the squares were straight. This is not one of my strengths!)  I cut out the letters using my cricut machine and vinyl adhesive paper. I was so happy with the way the project turned out and we use this every week!  I will share my upcoming menus and recipes in future posts!

Happy eating!

Tuesday, November 1, 2011

Banana Bread Muffins


The first day of November. From now until New Years I feel like food is constantly on my mind and I'm constantly wanting to bake something. This time of year just puts me in such a baking mood! So what did I want to do first thing this morning? Bake banana bread muffins of course!
This recipe is originally from a Better Homes and Gardens cookbook but I have tweaked it slightly. The original recipe was not quite sweet enough and didn't use enough bananas. I like to use very ripe bananas for this recipe or any banana bread recipe. I'm talking the really brown almost ready to throw away kind. You can even freeze bananas when they get to this point and then just pull them out as needed. When you get them out of the freezer just defrost in the microwave for about one minute and the peeling will slide right off and they will mash so easily. Perfect for banana bread recipes!
These turned out oh so yummy. Perfect with a big cup of coffee! Here is the recipe!

Banana Bread Muffins with Streusel Topping
 1 3/4 cup all-purpose flour
1/2 cup sugar
2 tsp baking powder
1/4 tsp salt
1 beaten egg
1/2 cup milk
1/4 cooking oil
3-4 bananas (peeled and mashed)
1/2 chopped nuts (optional)

Preheat oven to 400 degrees and grease 12 muffin cups. Combine flour, sugar, baking powder, and salt. Make a well in the center of the mixture and set aside. In a separate bowl combine egg, milk, oil and bananas. Add the egg mixture to the flour mixture all at once and stir just until moistened. Stir in nuts if desired. Spoon mixture into muffin cups filling 2/3 full.

Streusel Topping
Combine 3 tablespoons of all-purpose flour, 3 tablespoons of brown sugar, and 1/4 teaspoons ground cinnamon.  Cut in 2 tablespoons of butter until mixture resembles coarse crumbs.  Sprinkle over the top of each muffin.

Bake for 18-20 minutes or until golden brown and wooden toothpick comes out clean. Allow to cool 5 minutes before serving.

Enjoy!!

Monday, October 31, 2011

Cowboys and Indians

What a busy weekend full of fall fun! With two Halloween parties and volunteering for trick or trunk at our church, we spent most of the weekend in costumes! And I think I have eaten my weight in candy corn!! Each year around September I start thinking about costume ideas. I love for our costumes to all coordinate but now that we are a family of four this is more challenging! I try to get creative with costumes and not just go out and purchase one for all of us. My poor husband just waits for me to tell him what he will be wearing each year. :) He is such a good sport and goes along with all my crazy ideas!
This year I decided on cowboys and Indians-mostly because this allowed us to purchase the least amount of items possible! We only had to purchase one little Indian costume and one little cowboy hat. The rest we either had or borrowed from friends. I made my Indian costume from a family member's old dress. Super easy. I just cut the ends to make fringe and glued Aztec ribbon around the arms and neck. I made a headband with feather attached, wore brown boots and my costume was complete. Cowboy outfits are easy as long as you have a bandanna and hat! 

 My sweet little Indian!

Happy Halloween! 

Thursday, October 27, 2011

Homemade Cinnamon Dolce Latte

I love coffee. I mean I really love coffee. I wake up looking forward to my morning cup of coffee and find myself wanting it throughout the day. Every dessert, book, or comfy chair is more complete when a giant mug of coffee is in your hands. Rainy days? They scream coffee all day long!
I could spend a fortune at Starbucks because I love almost every drink there. If I'm in a ten mile radius of Starbucks I somehow find my car slowly drifting that way and before I know it I have a large steaming cup of soul warming goodness. Oh and I live less than 5 min away so you get the picture of how often I frequent there. The drinks there are so expensive though! You can hardly make it out of there spending less than five bucks. So I figured it up and if I visited Starbucks everyday, in a year I would have spent over $1800! Seriously? Think of all I could buy with $1800!
So anyways I have been experimenting with making my own Starbucks like coffee drinks at home, and I have to admit that they have been just as good! The cinnamon dolce latte is one of my classic favorites and it is SO EASY to make at home.
You just need one cup of milk, 1/2 tsp of cinnamon, and 1-2 teaspoons of sugar.
And of course coffee!!
 Mix cinnamon and sugar together. Add more or less sugar depending on how sweet you like your coffee drinks.
 Add milk and whisk together. Heat over medium heat just until it begins to boil.
 Pour into your coffee and you're ready to enjoy your own cinnamon dolce latte!

Now wasn't that easy??
Enjoy!!!

Wednesday, October 26, 2011

Fall Artwork

My two year old daughter is obsessed with painting right now. Every morning she says "Mommy, I want to paint today." She is happy just freestyle painting with her little paint brushes but lately I've been trying to explore some new ideas with her. We've been using our fingers, sponge letters and today we decided to create some fall art. I wanted to share with you three of the activities we did. They are all so easy and require very few supplies!
 Collect orange paint, a round sponge and paper. I happened to have these round sponges with a handle, but you could always use a different shaped sponge.

 Draw a simple pumpkin shape on the paper and then let them get to painting!

Cute little pumpkin! 
 This is our attempt at a colorful fall tree. I first painted out a tree trunk and branches. If your child is older they could draw their own. Then I let her use the round sponge to add colored leaves. She loved this!

 Some of the leaves started wandering off the tree :) We just considered those falling leaves and the one that fell a little too far we turned into a pumpkin!

Our third art project goes with the fall children's song "Five Little Pumpkins". My daughter loves this little song. If you are not familiar with it, here are the words and motions. Try singing it with your little one! They will love it!

Five little pumpkins sitting on a gate (five fingers up)
The first one said "Oh my it's getting Late" (Hands on Cheeks)
The second one said "There's a chill in the air" (arms around self)
The third one said "But we don't care" (swing pointer finger)
The fourth one said "We're ready for some fun!" (hand in air)
The fifth one said "Let's run, run, run!" (running motion)
So woooo went the wind, and out went the lights,
And the five little pumpkins rolled out of sight!

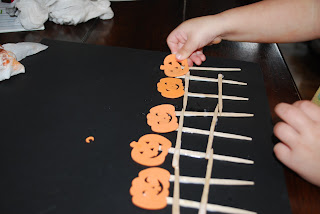
So after several rounds of this cute little song we decided to make a picture out of it. We created our gate using some wooden sticks I had. You could use craft sticks or toothpicks also.

 We designed our gate! This was her first time using glue. We had a couple of instances of trying to eat the glue, due to it resembling icing. So there was also a lesson on not eating glue. :)
 I had these foam pumpkin stickers that I have had forever and have had no use for. They were perfect for this activity. Of course you could always use paint or draw the pumpkins!
Five little pumpkins sitting on the gate!

Have fun exploring your creative side!

Tuesday, October 25, 2011

Pumpkin Carving Party

Last year was the first year that I decided to host a pumpkin carving party. This past weekend we had our second one and I think this is a tradition that is going to stick around! It is such a perfect fall occasion! We kept things simple with soups, finger foods, and cookies. We had a pumpkin carving contest, painting for the little ones, and a bonfire to end it all. We were blessed with perfect weather and the entire event went perfectly! Lots of fun memories made!
 Carvers at work!
Pumpkin painting for the little ones!
Messy but oh so fun!!


Wagon rides!


We had so many delicious foods!!

 Comfort food chili...
 Pumpkin Trail Mix...
"Monster" Cookies...
Pumpkin Spice Cookies

I made some simple decorations for the party-


After lots of carving and LOTS of eating here are the finished products!!!

And the winners are......

 
First place prize- Adorable fall apron!!

Can't wait for next year!!